Friday 6 November 2009
Removing old hidden devices
Usually this is an issue when you change a network card and want to reuse the original IP. The old driver and device is still registered in windows even though it's gone from device manager even if you select show hidden devices, so windows winges about duplicate IPs. It'll still work mind, but it's not the neatest way to keep your windows. The answer, in a command prompt, run the command set devmgr_show_nonpresent_devices=1 then start the device manage snap-in devmgmt.msc. Then when you show hidden devices it'll also show devices that are no longer in the system.
Wednesday 21 October 2009
Monitoring VMware vSphere ESX4 with Dell ITAssistant with SNMP
This is a howto for setting up SNMP on VMware vSphere ESX4 to work with ITAssistant, written because there's precious little documentation on the matter and what documentation exists is quite often misleading or plain wrong! Vmware in their wisdom have completely changed the way SNMP is configured in vSphere ESX4 (note not ESX4i which is a completely different kettle of fish and covered elsewhere). This means (young padawan) you have to unlearn everything you knew and any documentation for pre-vSphere can be pretty much thrown out of the window. The version used was 4.0.0 but should apply to future versions too. Install Openmanage 6.1.x or higherThis is done the same way as on older vmware servers or linux systems.1) download and unzip the Openmanage redhat package (OM_6.1.0_ManNode_A00.tar.gz) from the dell website to someone on in your vmware service console. gzip -d OM_6.1.0_ManNode_A00.tar.gz
tar -xvf OM_6.1.0_ManNode_A00.tarThis will give the following files/volders:
COPYRIGHT.txt
docs/
license.txt
linux/
setup.sh2) Run setup (as root) and select the first 3 options
sh setup.sh
srvadmin-services.sh start4) Open the vmware firewall to allo access to the openmanage web interface
/etc/snmp/snmpd.conf2) Locate line 41 which should contain this string:
com2sec notConfigUser default public3) Change the value from public to your string used with discovery in ITAssistant. 4) Append the following to the bottom of the file
smuxpeer .1.3.6.1.4.1.674.10892.1
This allows the snmp service to also serve out the Dell MIB information.5) Restart the SNMPD service
/sbin/service snmpd restart
It often shows "failed" for the stop part but you can ignore that.6) Restart the Dell Openmanage services for good measure
srvadmin-services.sh restart7) Open up the SNMP service on the vmware firewall:
/usr/sbin/esxcfg-firewall -e snmpd7) Test SNMP with the troubleshooting tool in ITAssistant (tools->troubleshooting tool). Select the SNMP connectivity test and click the configure button to change the get string to your string (if you're not using Alternatively use snmpwalk on the Dell MIB Tree
snmpwalk -v2c -c <your-string> 127.0.0.1 .1.3.6.1.4.1.674.10892.1
This should produce alot of scrolling text as it prints all the snmp output. I'm still ironing out the quirks with active alerts (SNMP traps) and hope to have a definitive guide soon!
tar -xvf OM_6.1.0_ManNode_A00.tarThis will give the following files/volders:
COPYRIGHT.txt
docs/
license.txt
linux/
setup.sh2) Run setup (as root) and select the first 3 options
sh setup.sh
##############################################
Server Administrator Custom Install Utility
##############################################
Components for Server Administrator Managed Node Software:
[x] 1. Server Administrator Web Server
[x] 2. Server Instrumentation
[x] 3. Storage Management
[ ] 4. Remote Access Core Components
[ ] 5. Remote Access SA Plugin Components
[ ] 6. All
Enter the number to select a component from the above list.
Enter q to quit.
Then select i to install3) start the Openmanage services
srvadmin-services.sh start4) Open the vmware firewall to allo access to the openmanage web interface
/usr/sbin/esxcfg-firewall -o 1311,tcp,in,OpenManage
Make sure you test it so you know openmanage is working and can see your hardware. If you can see the disk systems, memory, cpus etc, then fix openmanage first.Setup passive polling from ITAssistant Passive monitoring is where the ITAssistant polls the server at a regular interval. Supported methods in ITAssistant are CIM, SNMP and IPMI. SNMP with the "get" string is the usual method and what this howto covers. The ITAssistant documentation recommends creating a new readonly string for use with ITAssistant. 1) Edit the snmp conf file/etc/snmp/snmpd.conf2) Locate line 41 which should contain this string:
com2sec notConfigUser default public3) Change the value from public to your string used with discovery in ITAssistant. 4) Append the following to the bottom of the file
smuxpeer .1.3.6.1.4.1.674.10892.1
This allows the snmp service to also serve out the Dell MIB information.5) Restart the SNMPD service
/sbin/service snmpd restart
It often shows "failed" for the stop part but you can ignore that.6) Restart the Dell Openmanage services for good measure
srvadmin-services.sh restart7) Open up the SNMP service on the vmware firewall:
/usr/sbin/esxcfg-firewall -e snmpd7) Test SNMP with the troubleshooting tool in ITAssistant (tools->troubleshooting tool). Select the SNMP connectivity test and click the configure button to change the get string to your string (if you're not using Alternatively use snmpwalk on the Dell MIB Tree
snmpwalk -v2c -c <your-string> 127.0.0.1 .1.3.6.1.4.1.674.10892.1
This should produce alot of scrolling text as it prints all the snmp output. I'm still ironing out the quirks with active alerts (SNMP traps) and hope to have a definitive guide soon!
Friday 14 August 2009
Google Reader's "Send to" Feature
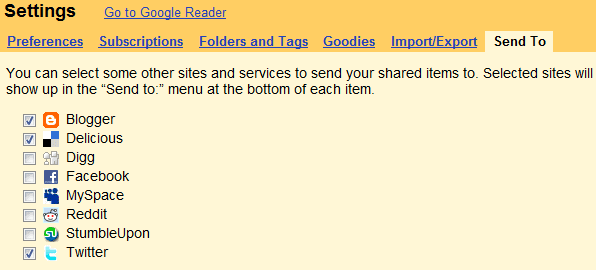
Google Reader's "Send to" Feature: "Google Reader added a new feature that lets you share posts in other services: Twitter, Facebook, Digg. The feature is opt-in, so you need to go to the settings page, click on the 'Send to' tab and pick your favorite services.
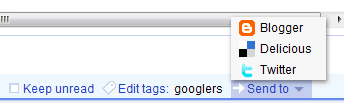
After selecting an item, use the keyboard shortcut Shift+T to quickly open the 'send to' menu. Google Reader opens a new tab when you choose one of the 'send to' options and most of the necessary information it's already pre-filled.
If your favorite service is not included in Google Reader's list, you can add it from the settings page by clicking on 'Create a custom link'. Here's how to add a 'send to' option for Google Bookmarks.
Name: Google Bookmarks
URL: http://www.google.com/bookmarks/mark?op=edit&output=popup&bkmk=http://googlesystem.blogspot.com/2009/08/google-readers-send-to-feature.html&title=Google Reader's 'Send to' Feature
Icon URL: http://www.google.com/favicon.ico
And here's how to use AddToAny, a service that lets you select between many social sites.
Name: Add to Any
URL: http://www.addtoany.com/share_save?linkurl=http://googlesystem.blogspot.com/2009/08/google-readers-send-to-feature.html&linkname=Google Reader's 'Send to' Feature
Icon URL: http://www.addtoany.com/favicon.ico
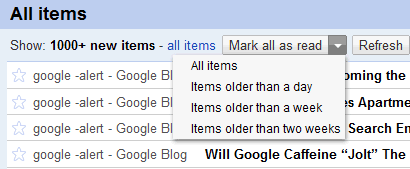
Google Reader added two other options: you can now subscribe to sites added to your contacts' profiles and mark as read items older than a day, a week or two weeks. The second option is useful if you have a lot of unread items and you only want to read the recent news. As you probably know, Google Reader automatically marks as read the items that are older than a month and this can't be changed.


 "
"
After selecting an item, use the keyboard shortcut Shift+T to quickly open the 'send to' menu. Google Reader opens a new tab when you choose one of the 'send to' options and most of the necessary information it's already pre-filled.
If your favorite service is not included in Google Reader's list, you can add it from the settings page by clicking on 'Create a custom link'. Here's how to add a 'send to' option for Google Bookmarks.
Name: Google Bookmarks
URL: http://www.google.com/bookmarks/mark?op=edit&output=popup&bkmk=http://googlesystem.blogspot.com/2009/08/google-readers-send-to-feature.html&title=Google Reader's 'Send to' Feature
Icon URL: http://www.google.com/favicon.ico
And here's how to use AddToAny, a service that lets you select between many social sites.
Name: Add to Any
URL: http://www.addtoany.com/share_save?linkurl=http://googlesystem.blogspot.com/2009/08/google-readers-send-to-feature.html&linkname=Google Reader's 'Send to' Feature
Icon URL: http://www.addtoany.com/favicon.ico
Google Reader added two other options: you can now subscribe to sites added to your contacts' profiles and mark as read items older than a day, a week or two weeks. The second option is useful if you have a lot of unread items and you only want to read the recent news. As you probably know, Google Reader automatically marks as read the items that are older than a month and this can't be changed.
Wednesday 12 August 2009
Restarting a list of servers
Windows 2003 has an enhanced shutdown command which allows shutdown of
multiple servers.
Running shutdown -i brings up a dialog box where you can enter the
list of servers.
Remember it's always good practice to put shutdown comments the mean
something so looking back in the future you'll know what was done.
multiple servers.
Running shutdown -i brings up a dialog box where you can enter the
list of servers.
Remember it's always good practice to put shutdown comments the mean
something so looking back in the future you'll know what was done.
Saturday 8 August 2009
Resolving port conflicts
If you ever need to find out which process is holding a port open use:
netstat -b
netstat -b
Posterous
Just found a new blogging site called posterous. It's main feature is making blogging easy by having entries all sent via email. While some people are used to having a web connection all the time, I find often I'm out and about and just want to do something quick and simple on my phone so being able to upload posts, photos, videos somewhere just by sending an email from the gmail client on my phone sounds great. The only downside is it posts signatures too :)Lets see if this works then...
Thursday 14 May 2009
Using ESEUTIL to recover and repair exchange databases with dirty shutdown state
There are plenty of guides on using eseutil but getting the parameters right always seems to be a case of trial an error, so here's a quick howto:
1) Copy all the original database and log files to somewhere safe. Then also copy them into a working directory. Eseutil will modify the files in situ so if it goes wrong you don't want your original files modified.
You need to have a copy of the database files (*.edb and *.stm) plus the transaction logs (Exx*.log where xx is a number relating to the information store). The location of the files is available from exchange system manager, but you really should know where they all are anyway.
I'm going to assume the temp directory for the database files is e:\temp\data and they're called exchdb.edb, exchdb.stm. If they reside in the 1st storage group, the transaction logs will be called E00.log (this is the most recent base file) and E00xxxx.log etc (these are the old logs). Lets assume these are copied to e:\temp\logs. You need to replace these with your own paths/filenames of course.
2) Check the database state and expected log files with
eseutil.exe /mh e:\temp\data\exchdb.edb
The output will show a line State: which will be either clean or dirty shutdown. If it's clean, then you don't need this article :)
It will also show which logs are required e.g. which hadn't yet been played into the database when the dirty shutdown occured. If you have any missing then you will have lost email. This generally only occurs if you lost a log drive and have replicated copies of the logs you can use.
3) "Recover" the database. This replays missing transaction logs into the database file - run:
eseutil.exe /r E00 /d"e:\temp\data\exchdb.edb"
You might receive an error that there is an outstanding database attachment. In this case use the /i switch in the command
eseutil.exe /r E00 /d"e:\temp\data\exchdb.edb" /i
4) recheck the database state with the command in 2). If it still shows dirty shutdown you need to repair the database with:
eseutil /p e:\temp\data\exchdb.edb
5) Recheck the database once more and it should show clean shutdown. At this point you should defrag the database
eseutil /d e:\temp\data\exchdb.edb
6) The file is now in a clean state and is ready to be put back into exchange so copy it back to the original location on your exchange server but don't yet mount the file. The last step before mounting the file is to get rid of any remaining errors using isinteg.exe. This tool requires the database to be in the original location on the original exchange server. It needs to be run several times until it no longer reports any errors.
7) Once the database file has no more errors you can now remount it in exchange.
Wednesday 11 February 2009
Verifying that bulk file copy
If you copy a bunch of files/folders from one disk to another and want to verify they have all copied correctly without corrupting, you can use cygwin and md5sum to verify them.
In cygwin run the following commands:
cd /cygdrive/[drive letter]/ [path]
e.g. cd /cygdrive/c/test. This is the source path to generate the MD5 hashes from.
find . -type f 2>/dev/null -exec md5sum {} \; >/cygdrive/c/temp/test.md5
This generates the md5 file which is a plain text file containing the MD5 hashes. Depending on the size of files to verify this might take a while. There may also be issues with files over 2GB in size (I haven’t tested this).
cd /cygdrive/[drive letter]/ [path]
e.g. cd /cygdrive/d/destination. This is the destination where you copied the files to.
md5sum –c /cygdrive/c/temp/test.md5 | grep –i failed >/cygdrive/c/temp/test-result.log
This checks the copied files against the md5 hashes and filters the output through grep to only include failed files. c:\temp\test-result.log will contain the results of the verify.
The result is either “ok” or “failed” but you’re probably only interested in the failed files.
In cygwin run the following commands:
cd /cygdrive/[drive letter]
e.g. cd /cygdrive/c/test. This is the source path to generate the MD5 hashes from.
find . -type f 2>/dev/null -exec md5sum {} \; >/cygdrive/c/temp/test.md5
This generates the md5 file which is a plain text file containing the MD5 hashes. Depending on the size of files to verify this might take a while. There may also be issues with files over 2GB in size (I haven’t tested this).
cd /cygdrive/[drive letter]
e.g. cd /cygdrive/d/destination. This is the destination where you copied the files to.
md5sum –c /cygdrive/c/temp/test.md5 | grep –i failed >/cygdrive/c/temp/test-result.log
This checks the copied files against the md5 hashes and filters the output through grep to only include failed files. c:\temp\test-result.log will contain the results of the verify.
The result is either “ok” or “failed” but you’re probably only interested in the failed files.
Subscribe to:
Posts (Atom)